
Started with a heavy weight piece of linen. This has been in my stash a while so I'm not sure where it came from, but I think it was a Hancock Fabrics purchase.

On the image above you can see that on the left the opening is about 1.5 inches narrower than the opening on the right. The left side will be the bottom of the bag. I ran a seam down the side using a running stitch. I know that this seam will not be under tension and doesn't need to be pretty so this was just a quick and dirty seam. I then trimmed the edges leaving .5 inches on one side and .25 inches on the other so that I could fold over the seams and flat fell them.


Pinned and ready I whip stitched the flat felled seam closed.

xxx
I had to allow for a closure both at the top and the bottom. I planned on either using a leather thong or a small rope to close the bag. I also rolled the edges which were exposed at the top of the bag opening. I find it easiest when doing a whip stitched seam to simply fold over and whip stitch loosely. When you open up the fold you have a neatly flattened seam.
For example:


If you whip stitch loosely when you open up the fold you hemmed edge is hidden nicely and from the right side you see very even, small, straight stitches.


This was the plan. As you will see later I left the opening at the top too large and had to close this opening a bit for fear that my arrows might fall out even when the bag was closed.

Here is a technique I used ALL the time when hand sewing. I sit at the table and pinch a section of the fabric between my stomach and the table. I simply lean onto the fabric to provide tension. I then pull the seam with my left hand and stitch with my right. This allows me to hold the seam flat, straight and provide consistent tension when I tighten my stitches.

This was not part of the original plan and I have no historical basis for it. I imagine that most bag quivers were used to simply transport large amount of arrows to the front line. I don't really believe that they were used, over and over and over again to carry a couple dozen arrows to the archery range. In any event I was worried that the linen would weaken and begin to develop holes at the bottom of the bag from use. As arrows are dropped into the bag over and over they might start to pierce the bottom of the bag. I decided to take a scrap of wool which was literally on the top of the garbage pile from last weekend's project. I cut the wool to a roundish sort of shape in hopes tht when the bag was closed it would provide enough cushion to ease the points in without damaging the linen bag. Only time will tell.


From the outside after the wool was stitched into place.


After pinning into place to ensure proper spacing I then ran a simple whip stitch from the linen bag through the loops of linen thread.

Completed attachment.

I then pulled the bag top over the leather and smoothed out the folded edge just stitched. The result is only a series of small stitches from the outside but the leather spacer is very securely in place.


After trying a few versions I ended up mixing. I know that in period the bottom of the bag opened so that the arrow bag might allow the archer to simply pull arrows from the bottom for use. I don't really envision me opening and closing the bottom of the bag often so I wanted a very tight and secure closure. I found that the leather thong provided a better closure and a more appealing look. Frankly I just liked it better. I went with about 1/4 inch hemp rope for the top of the bag. I wrapped the end of the rope with linen thread to keep it from fraying.


Here you can see the space where I left a large opening. I ended up stitching the opening about 80% of the way up. Next time I should probably measure and do a mock up. This project was sort of a snip and rip guesswork sort of thing.

You can see that I left the rope for the top closure a little long. I did that on purpose so that I could take one end of the rope and use it to tie to the bottom. This would allow me to make it into a shoulder bag in the event that the archery range (at Pennsic) is a long freaking walk!

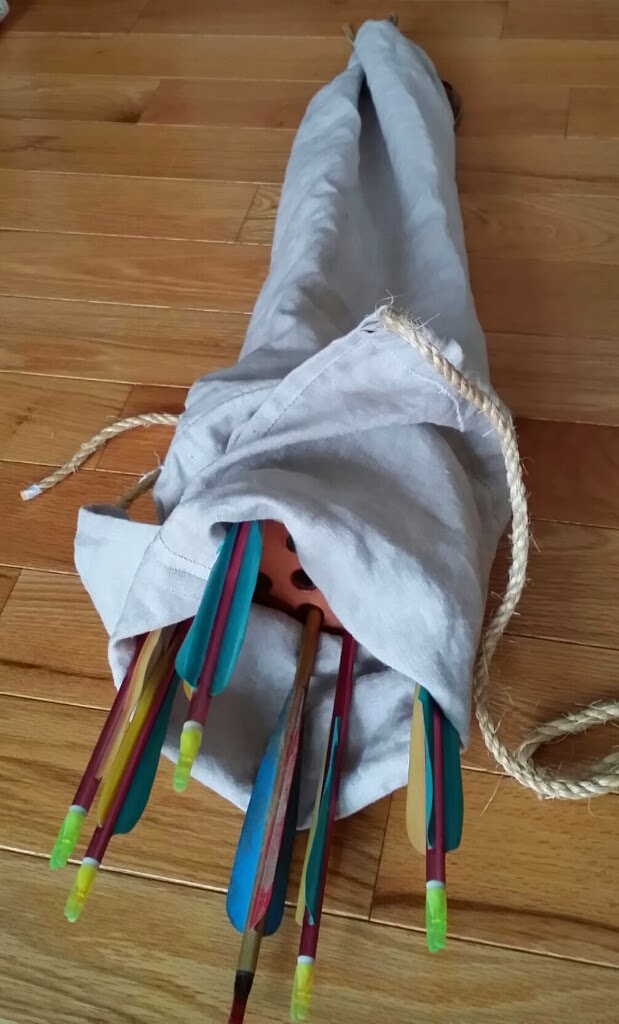
Here you can see what the bag might look like loaded. At the moment I have only carbon and aluminum arrows. My next project is to make some proper wooden arrows to fill the bag with.
Tied for use as a shoulder bag and ready to head to the range.
